Tuesday, May 17, 2011

Hello Clear Eyes!

Ok in the constant quest to shed years off of the appearance of my 1990 500sl I'm constantantly scouring ebay and the fourms for parts that I could use to make the car better.

Another one (of several things) that annoyed me was the headlight frames. They were yellowed, faded, and the passenger side was actually cracked and held together with some silicone. So I came across some new ones from rockauto.com (MUCH better pricing than ebay or any of the other parts sources).

I also decided to remove the antequated headlight wiper system, as I'm never planning to drive this car in foul weather, and in my opinion it detracts from the overall appearance of the car.

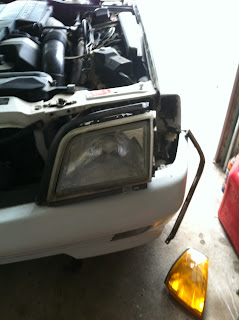
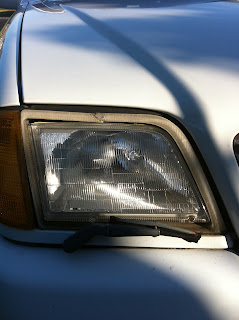
Here's a couple pics of what the original headlight "doors" looked like.


You can see the faded plastic and the crack in the passenger's side frame.


So the first thing to do is to remove the actual wiper arm. First pull it out towards you.


You will see a nut behind it, loosen the nut, and the arm will come free - now there is also a section of hose for the washer system (Yes MB thought it was a good idea to spray washer fluid over the front of the car to "wash" the headlight lenses).  The hose simply slides off the nipple that is next to the motor shaft.

Once it is off this is what you will see.


Now it's time to get into removing the headlight housing, and the wiper motor shaft and washer nipple.

First open the hood, then pop out the corner parking light. The corner light is held in from behind with a clip you need to squeeze and then slide the light forward.

Then you need to remove the plastic covers directly next to the headlight, about 2" wide, they are held in with a phillps head screw at the top that goes into a plastic insert. Pull the screw and use a panel removal tool to get the insert out. Then you need to remove the metal strip underneath the headlight. There are two phillps screws attaching this, one at the bottom of the fender directly behind where the fender is, the other underneath that plastic trim you just removed. It's pretty self explanatory.

Now the trim will come loose from the body, but the rubber seal is attached underneath it. It has little pegs that go into the metal trim, but the rubber seal continues all the way to the edge of the bumper and goes between the bumper and the fender, you have two choices here, you either need to lower / detach the front bumper, or you can let the trim dangle. I let the trim dangle.


Now we need to detach the headlight housing from the body. 2 8mm bolts on the side of the of the corner lamp, and one 8mm bolt on the other side, that goes into a little plastic insert.

Pull those 3 bolts off, and the headlight is free from the body. You can lift the headlight out. First thing to do, you will see the wiper motor shaft, and the nipple for the washer are on a plastic bracket held in by 2 smaller 8mm bolts, remove those two bolts, and you can slide out the bracket. The wiper shaft is held onto the motor via an 8mm nut, remove that and set the bracket, the shaft and the nipple off to the side.

Now you have to carefully remove the rubber gasket from the old headlight door. It's held in with little small plastic push pin clips. Small screwdriver, some patience and a panel / clip tool and they are out here.

Next you will notice two clips on top and two on the bottom of the headlight housing which hold the "door" onto the headlight. Pry gently with a screwdriver, and they will release. Wiggle the old headlight door off.

The headlight housing will now look like this:


Now get out your new headlight doors, these are the ones I used, part number is on the boxes for reference:


Here's a side by side of old door v/s new.


Now slide the new door carefully into position, and slowly clip it into place. You have to make sure the door is vertically straight to get it to clip on all the way. There are guide pins to line up the doors.

Once it's on, reattach the rubber gasket, and put the headlight back into the body. Hint, start all 3 bolts before you tighten any of them down. AS most insturctions say, assembly is the reverse of removal :)

And this is what you end up with:

Now you see the trim under the headlight has the holes for the wiper shaft and washer nozzle. I already have acquired new ones, which do not have the holes from a later model SL, however they need to be painted and then installed, that will hopefully happen this weekend, and will be covered in a separate post.

One more thing that unfortuantely I didn't photograph but is pretty self explanatory. Once you have the passenger side headlight out, you need to disconnect the electrical connector from the pump that feeds the headlight washers at the bottom of the windshield washer reservoir. The reservoir is held into the car by 1 8mm bolt at the top, then it slides up (there is a metal body bracket it slides onto). Simply following the washer fluid lines will make it clear which one is for the headlights. You can also disconnect the electrical connectors and or completely pull out the headlight wiper motors. I just disconnected the harnesses but left the motors in the car.

And here's an "after" pic. It really makes the car look newer / cleaner.

Monday, April 18, 2011

Some Random Orbital Love (Part 1).

So one of the worse things about my 500sl has been the paint. It was REALLY dull. The car sat for 8 years, most of it outside before I got it. There were spots where the car was just covered in dirt. I didn't really do much besides wash it last year. It's OK from 20ft away but kind of dull and lifeless compared to a modern car.

One of my neighbors and good friends (who is also a car guy) has gotten into detailing. He has an 18 year old son who has really gotten into it, and purchased a Porter Cable random orbital buffer. He's been bugging me to have a go at the SL. While he's a good and really nice kid, I was always a bit skeptical about letting him loose on the car with something that could so easily damage the paint. Finally his dad vouched for him, and was like, let him do the hardtop... If it doesn't work out or if he hurts it I'll get it take care of. So I agreed.

Him and his dad came over and we washed the car, and then he started...

All I have to say is WOW... he made a believer out of me real quick.

He used Meguiars ultimate compound on an orange pad.

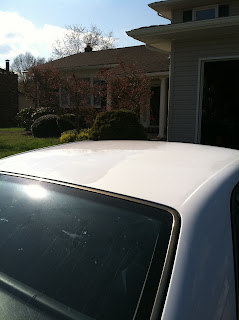
This is as he started...

You can see the difference already....


This is with the roof about halfway done.. The before and after is amazing. It looks like the paint is wet as compared to flat.


The results are hard to capture in a picture, but amazing in person. He ended up doing the whole hardtop for me, first with the compound and then with two coats of Meguiars cleaner wax.

The hardtop is hopefully coming off this evening when another friend brings over the storage cart and cover I purchased from him.

I went from being skeptical about the buffer to looking forward to when we can do the whole car... More to come!!

Out of hybernation...

So after a long cold winter, numerous blizzards etc... The 500sl has finally emerged out of the garage for another season. It spent the winter with the hardtop on, and I charged the battery once every 2 weeks with an old 10 amp Sears Crafstman charger my late father had purchased probably 25 years ago. It still works fine however....


So now that the weather finally cleared up, it's time for the 500sl to come out for the season. Hit the key and it started right up. No issue no nothing. And once I backed it out of the garage, the floor was completely dry. Not a drop of anything had leaked. Not bad for a 21 year old car!


So now there's much more to come for the year.... Next step will be to get the hardtop off. I acutally purchased a cart and cover to store it properly this season!


Saturday, October 16, 2010

Where do we put zee coffee??

For some reason, older German cars didn't come with cupholders.
Now Mercedes Engineers may be cringing at the idea of this, and I have heard various claims over the years from the fact that Germans tend to drive, and not drink coffee, play with their phones etc. They must be dedicated smokers though because Mercedes cars, especially sedans, have more ashtrays than I have ever seen in another car.

In the later years of R129 production, Mercedes finally gave in to the North American Market's demands and replaced the center console insert with a dual cupholder. It does snap right into an earlier SL center console, replacing the Lighter / Ashtray / Cassette Holder - Yes that's right, early R129's came with cassette holders. Apparently while drinking coffee or another beverage of choice was taboo, the Germans wanted to make sure that you had your David Hasselhoff's Greatest Hits tape within easy reach. The R129 cupholder insert is approx $300 new from Mercedes, and used ones go for over $150, so I figured there had to be a better DIY solution.

My solution involves absolutely NO modification to the car, or the cassette holder, and can be completely 100% reversed and the cassette holder reinstalled with no evidence it was ever there. 

I started to examine the center console and the cassette holder section, and decided that I could fabricate something to take the place of the tape holders. My car has long since been converted to a Nakamichi in dash 6 CD changer, so I couldn't play a tape even if I wanted too. This blog unfortunately is a little bit light on pictures, because my camera's battery was dying, but it's all pretty self explanatory once you get started and see everything for yourself.

Here is a pic of the cassette holder / Ashtray / Lighter assembly out of the car. (This isn't from my car but from an auction on German Ebay).

You can clearly see the 6 Cassette holder in there. Now the first step is to pull out the cassette holder inserts. They are just a press fit in there. Open all the tape holders grab firmly pull and wiggle... it will come out. Pull the little tiny light bulb out of it's socket at the bottom, and remove the piece from the car.
Once you have it out, you will realize that it's actually two pieces. One contains the actual cassette boxes, and then there is an outer frame that attaches to the actual rest of the console. Release the tabs, and pull the inner cassette boxes from the outer frame. This is what you will have once you have done that.

Now, I went to the parts store - Advance Auto parts in this case, and perused the generic add on cupholders to find one that I could graft into this insert. After trying a couple I decided the best donor cupholder was one called the spillmaster console twin made by a company called Hopkins. It was 10.49 at my local parts store. This is what it looks like:


It's actually a dual cupholder with adjustable cupholders on both sides, but for our purposes it will work perfectly, once some modification takes place of course.

If you can't find this cupholder locally it is available on amazon.com here:
http://www.amazon.com/Hopkins-SMT-Twin-Cupholder-Black/dp/B000FGIBYQ

So once you get this this cupholder, here's how to build your SL's new cupholder. 
This is what you will need: 
1) Aformentioned Aftermarket Cupholder
2) Scrap piece of wood at least 1/4" thick Large enough to fill the cassette holder
3) 4 Drywall or other screws - I used 1 1/4" Coarse Drywall screws because I had them. 
4) Some flat black spray paint - You can also use Satin Black if you prefer.


First, take the outer frame of the cassette box, and find a suitable piece of scrap wood to make a bottom for it. In my case I used some 3/8" Birch plywood I had laying around. What I did was place the cassette holder frame on the wood and trace out the outline on the wood, then cut it out with a jigsaw - WITH one change. You want to cut to to the exact width side to side but you want to cut it 1/4" SHORT front to back. This will make sense later.

Here's what the bottom looks like in the cassette holder frame. Note: It's just set in there, and not attached in any way yet.
Note the 1/8" gaps on the top and bottom. Once you have the piece cut, take it out, and spray one side with the flat black paint. Set it aside and allow it to dry for a few minutes. While you are waiting for the paint to dry, let's get started modifying our cupholder. 
First thing you have to do, take the cupholder and set it on the ground. You will have to cut one side off, to use inside the cassette holder. Take and lay the cassette holder on top of it, to get a rough Idea of where you have to make the cut. Here's what it will look like. 
You may want to cut this a little bit big, but you can always use the other side if you really mess it up. I used a miter box saw to start the cut and finished with a hacksaw blade without a handle. (please excuse my foot at and shoe in the pic). 
This is roughly what it will look like: (Note there should be less of that central compartment there, these are pics of the other half because my camera's battery was dying the other night when I was putting this together). 
So now that you have half the cupholder that fits inside the cassette holder, it's time for the first step in putting it together. 

Make sure your wood bottom is dry, set it in the cassette holder, then set the cupholder into the cassette holder, with the cut side facing what will be the back of the cupholder. Make sure that the cut side is flush against the back of the cassette holder. Once it is flush, take two drywall screws and screw the cupholder to the wood base through the openings in the cupholder that allow it to slide. Specifically at these spots noted on the pic in yellow:


This is a pic of what it will look like from underneath. 
You can see the two screws protruding. Not to worry there is plenty of room in the r129 console for them. 
Here's a pic of the final product with the screws circled just in case it's not clear. 

Now the next step is to adjust the cup holder to your prefered size. In theory you can reach down and mess with the adjustment while its in the car, although I suspect it would be a bit of a pain to do. You pull out that little flap of plastic, set the cupholder to where you want it, and push it back in to lock it in place. Personally I adjusted mine using a Large Dunkin Donuts coffee cup, as that is my preferred poison. Medium cups have the same base width, but are just shorter. This also left me with a convenient space to slip my iphone between the front of the holder and the front of the cassette frame. 

So, now once you have your cupholder where you want it, it's time for the final steps. Remember how I told you to cut the top to bottom dimension 1/4" short - here's why. The way this cassette box sits in the console it sits on approximately a 20 degree angle. You want to try to compensate for that angle as much as possble (so that the cupholder ends up level when it is in the car). After some measuring and messing around here's what I did. Which I think works best, and requires NO modification to the car, or the cassette holder frame.
What you need to do is angle the bottom up in the cassette holder until the wood lines up with two cutouts on the side of the bottom of the holder. Then use one screw on each side to secure the bottom on that angle. It will make more sense in the pics:
You can see the scew and the bottom now on an angle. On the other side the screws are a bit offset, but use this side as a guide, then insert screws as needed all around - Note the screw will strictly go into the wood bottom, not into the cassette holder frame, however the heads of the screws will hold the entire assembly tightly in place. 

Once you have all your screws in - I used 2 in front and two in the back, what I did was to spray the entire thing with a coat of flat black paint, because it seems like the different plastics, the wood and the screws have different textures, this way it would all have a uniform appearance. Here is is with freshly sprayed paint, waiting for it to dry:

Now, the one thing you need to do in the car, is remember that light bulb in the socket that used to plug into the bottom of the cassette holders, what I did was simply remove the bulb from the socket - It just pulls out, and then wrapped the socket in electrical tape, then stuffed just laid it in the console.
 
Once everything is completely dry - I waited several hours, take the piece back and snap it into the center console of the car. 
And here's what the final product looks like in the car:


Now The sliding cover doesn't come down past the front of the cupholder but to me that's no big deal. My front sliding cover that covers the ashtray / lighter is broken I have the piece but the handle is broken off. I'm going to save that repair from when I remove / replace the wood center console piece and the entire console has to come apart. 

Here are a couple more pics:

And sorry this shot is so dark, but the all important "in use" shot:


Sunday, October 10, 2010

Cheap, Functional, and reversible visor door repair...

Ok, another one of the things that really annoyed me about my car was that the "doors" or folding covers for my sunvisors were missing. Inevitably these all break, especially in r129s that sit in the sun with the top off. The plastic is brittle, and little pieces crack off.

You can see the exposed mirrors / lights in this pic above.

Now, finding R129 sun visors in good condition is a task in itself, especially considering my interior color. They are also VERY expensive, because of their rarity (over $150 per side). So I decided to think outside the box on these, and while searching ebay, found a set of w126 visors, in the right interior color. I ended up winning them for $12.50 + postage.

Initially I was ambitious enough to think that I could just transplant the inserts, and that all would be well. Well I came to realize that although close, the inserts are slightly larger than those used on the r129, and that they would not work. Initially I was going to call it a loss and put the w126 visors on the forums to try to recoup my expenditure. Then I started thinking about it, and decided that I really didn't need the $12.50 that badly and I was willing to experiment. Note: w124's, w201's and w126's use the same visor insert so those visors are plentiful and cheap.

My criteria for this procedure was as follows.

- Nothing irreversible could be done to the r129 visors, because of the off chance that one day I find the right inserts for the right price.
- The finished product had to be cosmetically acceptable, and look like something factory
- I didn't care if the lighted mirrors worked or not, since they didn't work now, and I personally don't see much of a need for them. (Women please don't shoot me).

So I set off trying to see what could be done. First I removed the visors from my car. Here is a picture of the visor removed.

As you can see the visor door had broken off. First step, pry the mirror and light cover off - it's just a press fit. Then you will see this:
Note: In this picture the 6 #1 phillps head screws attaching this internal assembly to the actual visor have already been removed. You will also probably find bits of broken plastic that were the remnants of why your original doors broke off. 
Once you remove those screws pull this assembly off and you will see the base of the r129 visor. 
You can see the 6 screw holes in this visor. I then proceeded to remove just the door off of one of the w126 visors - note: you have to remove the mirror / light cover piece from the w126 visor
Here is a pic of the door removed.

Now the first thing I did was lay the door over the r129 visor to see if this was even a viable possibility. 

As you can see, with the innards removed, the door is almost a perfect fit. Now the key to this is those two little pegs the w126 visor uses to hinge with. They are visible in the above pic. What you need to do is CAREFULLY drill two holes in the sides of the r129 visor for those pegs to fit into. that way the w126 door will now be hinged on the r129 visor. The other thing you need to do is trim the inside plastic of the w126 door, so that it will allow it to fully fold and close. This will make sense when you do this. So what I did, is mark the locations of the pegs with a pencil, and carefully drilled two holes with a 7/64" drill bit. Then, and this is the scary part, you have to get the pegs into your newly created holes. The visor door is hard plastic, but it WILL flex, you won't break it. Once you do that, close the w126 door, trimming the inside plastic as necessary to get it to sit flush.

 Here is a picture of the finished product:

The visor door actually does hinge up and down, although it a bit tight of a press fit when closed, however there are no internals, if one were to hinge the visor door upwards all you would see is the foam inserts. However if you were to remove this visor door, you could reinsert the r129 pieces, and have no visible traces of these doors being on there. Sure I lost the mirrors, but for $12.50, this makes the car look much more presentable than exposed mirrors. 

Here is a pic of both the visors done and ready to be reinstalled in the car.

"///AMG" Pedal Set

So I scored this "///AMG" branded stainless steel pedal set on ebay for $26.50 shipped. It's not needed or anything, but I figured it would at least dress up the car a bit.


Initially it seemed as if it were not going to fit. So I contemplated selling it. After there was a ton of interest expressed about it, I decided to take another look, and realized that the only thing that would not fit would be the dead pedal, as the piece is flat, and the floor in that area is not. R129's don't have a really clearly defined dead pedal area in the floor, and this piece is flat, the floor is not.

So I decided to go ahead and install the 3 pieces that would fit in the car.
First I put the emergency brake release pedal on. The only thing that it needed was to pop off the original rubber one, and instead insert the new steel one, the rubber backing was the same.
Now the Accelerator and Brake pedals require a bit more work. The aftermarket pedals are held on with allen head bolts. First thing to do is remove the rubber brake pedal cover from the pedal. What I did next was to use a simple spring clamp to hold the pedal in place while I drilled the 4 holes for the bolts. 
The pedal material isn't that hard, and a 12v drill with a carbide 1/8" drill bit went through fine. Once I drilled all 4 holes I inserted the bolts in and tightened them up with the allen key. 
As you can see in the picture above, the next thing is to remove the factory rubber pedal covering the accelerator pedal. There is a rubber loop across the bottom of the pedal cover where it attaches to the base of the actual pedal. you can either unscrew the pedal from the floor and slip it off, or you can just cut it off (I chose the easy way out) 
Once you have the pedal off, clamp the accelerator pedal into place. The factory accelerator pedal is plastic and drills very easily, this part takes 2 seconds. 
Then just attach and tighten the bolts for the accelerator pedal and you're all done. I think it really adds to the look of the car. And don't mind the cheap all weather mats, I'm looking for a set of r129 mats in the right color, Just didn't want to mess up the carpet in the meanwhile.
Here's a pic of it all done, from a bit further.


Peeling center caps no more...

So another one of the cosmetic things that bothered me about my 500sl was the fact that despite having the very nice and correct ///AMG wheels (with proper 129 part numbers) the wheel center caps had seen better days. The paint was peeling in some way on basically all of them, although a couple had the paint completely peeled off.

This is what they looked like:

This was one of the better ones. The next one had the paint peeled completely off:
After some searching, and looking at the various sets of center caps available for Mercedes wheels - virtually any MB wheel post 1985 uses the same center caps btw, I decided to look for a set of these:
They are from the newer 2001+ cars, and the Mercedes star and outer ring are chrome while the center is the standard silver Mercedes wheel color. I thought they would make the wheels stand out a bit. I managed to find a set of used ones in perfect condition for $20 shipped on ebay. When I went to put them on I realized the car had a set of McGuard wheel lock bolts on it, after tearing through the car I realized that the key was there, however I have had nothing but bad luck with wheel locks and the keys, so I ordered 4 new wheel bolts, and removed the wheel locks while taking off the wheels to change the center caps. 

Here is the car with the new center caps on. 


Sometimes it's the small things... There are a lot of little detail items this car needs that still need to be addressed. Slowly I'll get through all of them.